
The Basics of Paver Patio Installation Bay Area
Creating a beautiful outdoor living space with a paver patio is a rewarding project that can significantly enhance the aesthetics and functionality of your home. With the lush landscapes and mild weather in the Bay Area, more and more homeowners are choosing to invest in paver patio installation Bay Area. Understanding the fundamentals of paver patios can help you make informed decisions throughout the installation process.
Understanding Paver Types and Materials
Pavers come in a variety of types and materials, each offering distinct benefits and aesthetic options. The most common materials include concrete, brick, and natural stone. Concrete pavers are renowned for their durability and versatility, while brick provides a classic charm. Natural stone offers unmatched elegance but may come at a higher cost. Each material will affect not only the look of your patio but also its longevity and maintenance needs.
The Importance of Planning Your Design
A successful paver patio installation starts with a thoughtful design. Consider your outdoor space’s size, shape, and intended use. Sketch out a layout or use landscaping software to visualize how your patio will integrate with your yard. It’s crucial to think about factors such as sun exposure, wind direction, and how the space will be used—whether for entertaining, relaxation, or landscaping features.
Tools Required for Installation
Before beginning your project, ensure you have all the necessary tools. Key tools include a shovel, a level, a rubber mallet, a measuring tape, a compactor, and a broom. A wet saw can be particularly useful for cutting pavers to fit your design. Proper tools ensure a smoother installation process and enhance the overall quality of the finished project.
Preparing Your Site for Paver Installation
Clearing the Area and Marking the Layout
Once your design is ready, it’s time to prep the installation site. Begin by clearing the area of any debris, grass, or old patio materials. Use stakes and strings to mark out the layout of your patio, ensuring it mirrors your design. Make any necessary adjustments before proceeding, as this will set the foundation for your entire project.
Excavation Techniques for Optimal Drainage
Excavation is a critical step in ensuring your patio lasts. Dig out the area to a depth of around 6-12 inches, depending on the type of paver and soil conditions. It’s essential to achieve a slight slope away from structures for optimal drainage—this helps prevent water pooling on your patio surface. Proper drainage is vital to the longevity of your patio.
Creating a Solid Base for Your Patio
A solid base is crucial for stability. After excavation, lay a base of gravel about 4-6 inches thick and compact it firmly. This base enhances water drainage and prevents shifting. On top of the gravel, you may install a layer of sand, about 1 inch thick, which acts as a leveling agent for your pavers. Ensure everything is level and compacted for optimal results.
Step-by-Step Paver Patio Installation Process
Laying the Pavers: Patterns and Techniques
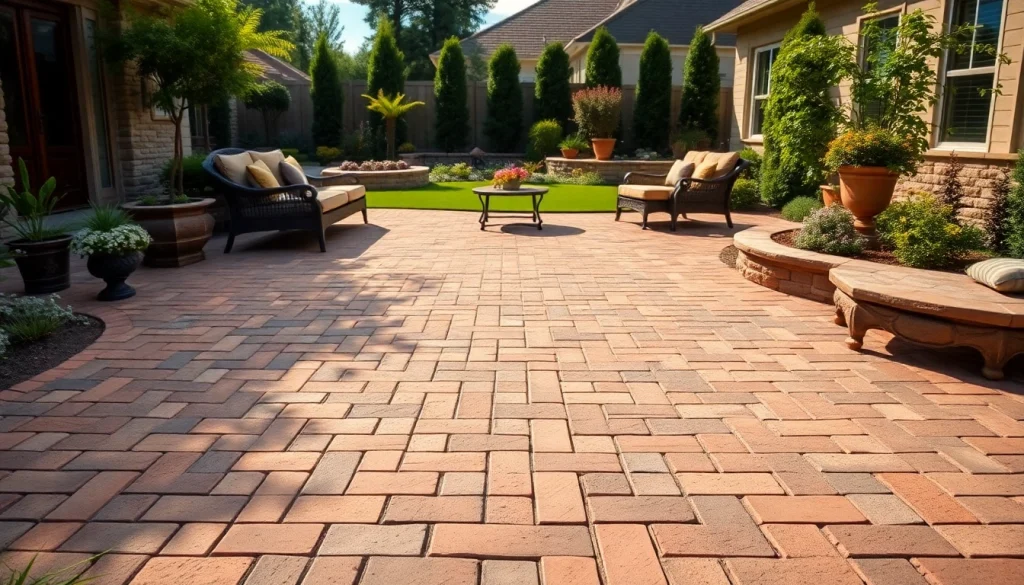
With your base prepared, the time has come to lay the pavers. Begin at one corner and work your way across the space. There are various patterns you can choose from, such as herringbone, running bond, or basketweave. Each pattern has its own visual impact and should complement the overall design of your outdoor space. Use spacers to maintain consistent gaps between pavers for an even look.
Filling Gaps and Sealing for Longevity
After laying down the pavers, fill the gaps with polymeric sand, which helps to lock the pavers in place and prevent weeds. Sweeping the sand into the joints is crucial—make sure you do this while the sand is dry. Afterward, consider applying a sealant, which can enhance the colors of your pavers and offer additional protection from stains and weathering.
Finishing Touches to Enhance Aesthetics
To complete your paver patio, consider adding finishing touches such as landscaping around the edges, installing lighting, or integrating outdoor furniture. These elements not only enhance the visual appeal but also improve the usability of the space. Think about how you want the area to feel; a well-designed patio should blend seamlessly with its surroundings.
Maintenance Tips for Your Paver Patio Bay Area
Cleaning Routine to Preserve Beauty
Regular maintenance will keep your paver patio looking new. A simple cleaning routine includes sweeping away debris, hosing down the surface, and using a mild detergent to tackle stubborn stains. Be cautious about high-pressure washing, as this can damage pavers and joints. Doing this regularly will prevent dirt buildup and prolong your patio’s life.
Repairing Common Issues with Pavers
Over time, pavers can shift or crack due to the elements. If you notice any unevenness, you can remove the affected pavers, re-level the base, and replace them. For cracks, using specialized filler or epoxy can restore damage. Regular inspections will help you catch these issues early before they escalate.
Seasonal Care for Long-lasting Patios
Seasonal care is essential in the Bay Area, where weather can vary. During rainy seasons, ensure drainage systems are functioning correctly to avoid water pooling. In the summer, check for any overgrowth or cracks, and seal your patio if needed. Preparing your patio for seasonal changes will ensure it remains beautiful and practical for years to come.
Cost Considerations for Paver Patio Installation Bay Area
Budgeting Tips for Your Project
Understanding the costs associated with a paver patio installation will help in budgeting effectively. Costs depend on materials, labor, and any additional features you may wish to include. Get multiple quotes from professionals or determine how much of the work you can handle as a DIY project to create a realistic budget that accommodates all elements.
Comparing Professional Costs vs. DIY
Deciding between hiring a professional or undertaking the project yourself will significantly impact your budget. DIY can save money, but consider your skill level and time commitment. Hiring a professional ensures quality work and may offer warranties on materials and labor, providing peace of mind for your investment.
Long-term Value of a Quality Patio
A well-installed paver patio not only enhances your enjoyment of your outdoor space but can also add significant value to your property. Quality materials and workmanship pay off in durability, reducing future repairs. Consider the long-term benefits and increased home value when planning your paver patio project.
Frequently Asked Questions
What is the average cost of a paver patio installation?
The average cost varies greatly, typically ranging from $15 to $25 per square foot, depending on materials and labor. Always get multiple estimates to find the best price.
How long does it take to install a paver patio?
The installation timeline can vary, but most projects take 1-3 days depending on size and complexity. Proper planning will help streamline the process.
Can I install a paver patio myself?
Yes, if you have the right tools and experience, a DIY installation is possible. However, consider hiring professionals for best results and to avoid potential pitfalls.
How do I clean and maintain my paver patio?
Regular sweeping and occasional washing with mild detergent will keep it clean. Additionally, apply sealant every few years for protection against the elements.
What are the best materials for paver patios in the Bay Area?
Concrete and brick are popular choices due to their durability and aesthetic appeal. Natural stone, while pricier, offers luxury and uniqueness to any patio project.